This is what I learned in my Santa Rosa Junior College theater arts make up class as per instructor Maryanne Scozzari. We’ll use these life castings to design and create prosthetic noses for character make-ups, just like they do on Sci-Fi’s Face Off reality TV show, well, almost.
By reading this post you agree to follow all safety guidelines and that you are responsible for maintaining the safety of yourself and your model. You also agree that you will not proceed unless you are over 18 years of age or have a parent in charge. Thank you for being careful!
1) First step to create a life mask: Prepare the space

Cover the work table with paper, it’s going to get messy. Lay out all supplies. Coat a plastic mixing bowl with Vaseline and fill one third full of warm water. Precut a package of plaster bandages into three lengths: about 8” 5” and 3.” Fill a pitcher with warm water for mixing the alginate and the plaster. We used Hydracal for the plaster. Plaster of Paris is too soft to make a useful cast. Ultra Cal is favored by most professional special effects makeup artists, but it’s trickier to use and more expensive. Dental Stone is super hard and is used by dentists. Put up signs if necessary to maintain quiet and prevent interruptions.
2) Prepare the model
Pull back long hair into a low ponytail. Apply hair jell. Pull on an inexpensive bald cap and cut off excess if necessary. Rub petroleum jelly around the front and top edge of the bald cap, into the hair around the face, at the nape of the neck, and on the peach fuzz on the sides of the face. Wipe with alcohol to remove excess. Apply KY jelly to the eyebrows (especially if they’re bushy) and maybe to the eyelashes. Do not put oil-based products such as Vaseline near the eyes. Work out a thumbs up or down method of communication with the model so she can signal that she’s okay. People who tend to be claustrophobic find life casting stressful. Other people get so relaxed they almost fall asleep during the casting process. The model must stay upright and relaxed. No talking, eyes closed, breathing through the nose.

3) Alginate
Put on surgical gloves. Mix the alginate according to manufacturer’s directions. Work quickly, scooping, mixing and smooshing with a spatula. Apply to model’s head to cover thickly, rubbing down, pressing gently into crevices. Work quickly but be gentle. Once the alginate is set it will no longer stick to itself. Work the alginate down the sides of the face and neck and towards the center. Do not rub up and down. Make sure to cover the area around the nostrils, while leaving breathing holes.
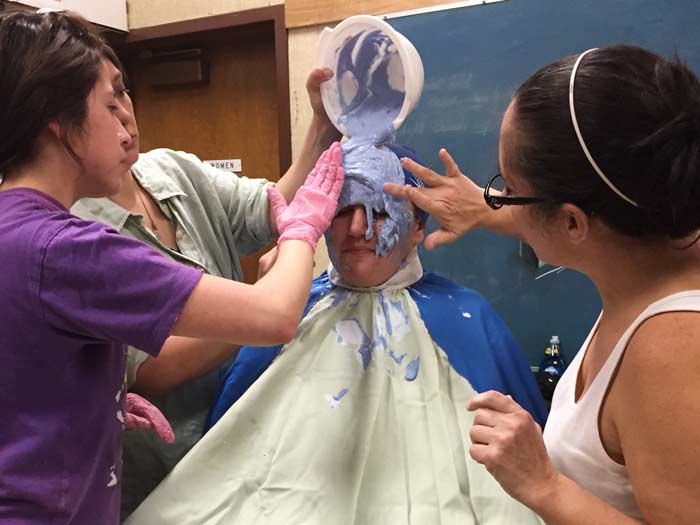
Never put straws up the nostrils! This is dangerous for the model, and could deform your mold. Keep your eyes on the nose to make sure the airway isn’t blocked. Speed up setting with hairdryers set on cool. Be careful not to blow air up the nose.
4) Plaster Bandages

Once the alginate is set, wet a thin strip of plaster bandage, squeeze out excess water and apply to the nose area to strengthen it. Repeat until the nose area is reinforced with at least 3 bandages. Apply 3 layers of plaster bandages to the rest of the face, alternating horizontal and vertical layers. End with strips around the perimeter to hold the mold together.
Dry with a blow dryer on the cool setting, keeping a hand between the blow dryer and the model to make sure it doesn’t become hot.
Never put plaster directly on the skin!
5) Remove the mask
Feel the plaster to see if it’s damp. Once it’s dry have the model slide forward out of the chair, put her feet on the ground and begin to gently move her face around inside the mask, leaning forward, supporting the mask in her hands. Insert your fingers between the mask and the model’s ears to loosen it. Pull the bald cap up and off the back of the model’s head, letting it slide off with the mold. Help support the mask as it comes off. The alginate will hold an amazing amount of detail. The plaster bandage layer holds it together.

6) Prep the negative mold for plaster
To make the cast leak proof, add several strips of plaster bandage to the nose holes and allow to dry. Place the cast in a cardboard box on top of shredded paper or other padding. Rub Vaseline around the inside of the nose holes. You can plug them up with bits of oil-based clay (such as Plastilina). Rub Vaseline where the plaster bandages will touch the poured plaster such as inside the bottom neck area and around the edge of the whole head. Otherwise the plaster will stick to the plaster bandages and make it difficult to open the mold. Plaster always sticks to plaster
7) Plaster pour
Put on a particle mask to protect your lungs. Fill the plastic bowl that was coated with petroleum jelly with cool water. Carefully add plaster until the water no longer absorbs it and it looks like a dried riverbed. Squish the mixture with your gloved hands, squeezing any lumps. Try not to introduce air into the mix. Pour into the prepared molds. Tap the mold to release air bubbles as it cures. It will become hot and then cool. Carve your name and the date onto the back side of the mold.


Poured plaster and alginate mold in a bed of shredded newspaper, inside a box.
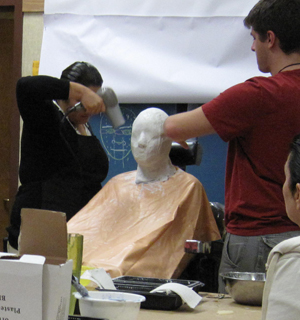
8) Cure the mold
Allow the mold to cure for 4 to 6 hours. The nose on the mold should be cool to the touch. Spread out newspaper. Turn the mold over onto a soft surface. Remove plaster bandages and discard. If they don’t come right off, cut carefully with a sharp knife. Remove the clay nose plugs and the alginate. Discard. Clean up any bubbles or other flaws on the plaster cast using carving tools, but don’t change the skin texture or other details.

Place the mold on the middle rack in a preheated oven, at the lowest possible setting (less than or equal to 200 degrees) and bake for 45 minutes to 1.5 hours. Do not use a pan, just place it on the rack so air can circulate. Check it frequently! If your mold turns yellow take it out. Otherwise, let it cool in the oven, turned off, with the door open.
9) Final prep and seal
Finally, seal with a mixture of alcohol and baby oil, or clear acrylic spray. Use 2-3 coats.
Your mold is ready to use for making facial prosthetics such as noses, horns or zombie skin. See how to make a prosthetic nose or other cold foam appliance for the face. How to Make a Prosthetic Appliance on a Life Cast. Enjoy! —Auntie Stacey
© Copyright 2026 Stacey Alysa D., All Rights Reserved.

Thanks for the article. Great fun!. Next step: bronze.
LikeLike
I could NEVER do this. Since it said that people with claustrophobia will find it stressful, then that means that I just won’t ever be doing any life face masks of any sort. There’s no way I would ever even go near something like this, ESPECIALLY if my mouth has to be covered during it. I have to breathe through my mouth.
LikeLike
Cool! Gotta love the internet for these kinds of connections. :)
LikeLike
Hi Emma,
Yes, you can if you credit Stacey Dennick. Thank you for asking. Where are you taking the class?
Go theater!
Auntie Stacey
LikeLike
Thank you I am taking Intro to Theater at University of Alaska – Mat-su Collage
LikeLike