Featured

Frequently Asked Questions

Feel free to email me with more questions

How do I remove the face paint?

Soap, water and a washcloth. Kids like letting the paint float off in a bath. You might need a little washcloth action.

Is the face paint safe?

Face painting by Auntie Stacey, Sebastopol, CA

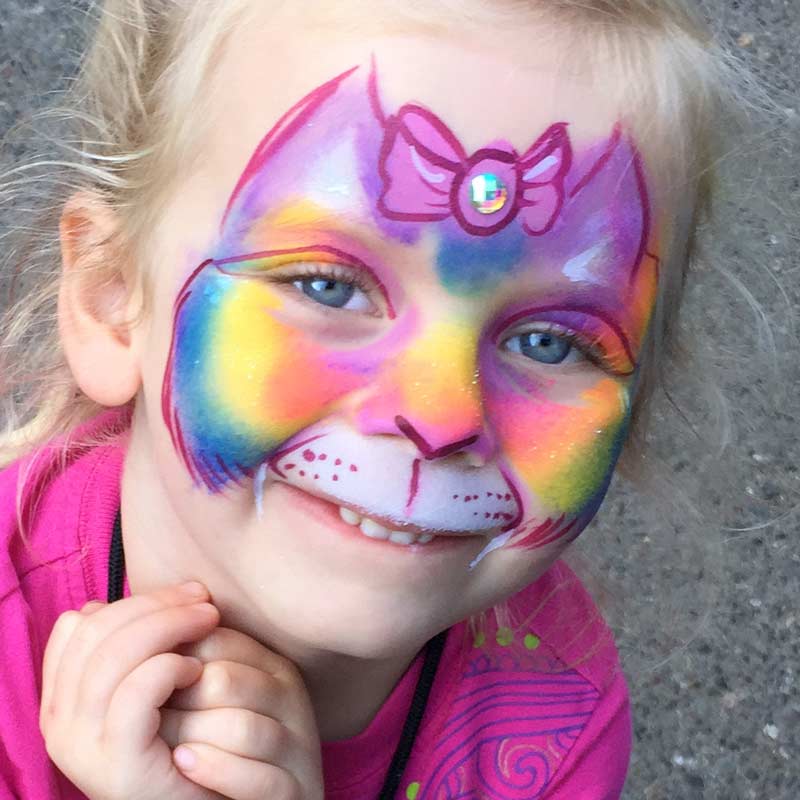
Yes. The cosmetic-grade supplies I use are highly pigmented makeup (don’t tell the boys!) that, like all makeup, contain anti-microbial ingredients. In addition, I’m a stickler for cleanliness. I keep my kit hygienic and free of cross-contamination by cleaning my brushes thoroughly between uses, and using a new sponge for each person. I utilize Q-tips to apply lip color.

In addition, I won’t paint anyone who is sick or suffering from skin or eye illness.

I’ve never had a problem with allergies, but anyone who tends to be allergic to cosmetics can request a patch test. 

Can you face paint and twist balloons at my party?

Yes, probably. Depending on the number of guests that attend, their average age, and your budget. Little kid’s birthday parties usually last about two hours. I find it’s best for me to arrive at the very start of the party, while it’s still relatively quiet, and stay for 1.5-3 hours.

If you have a large group, you might want to stick with just a Comedy show, or choose between Show and Face Paint, or Show and Balloons.

Silly Stacey in clown costume, face painting, balloon twisting, children's entertainer, fun and games

What’s the “Glitter Bar”?

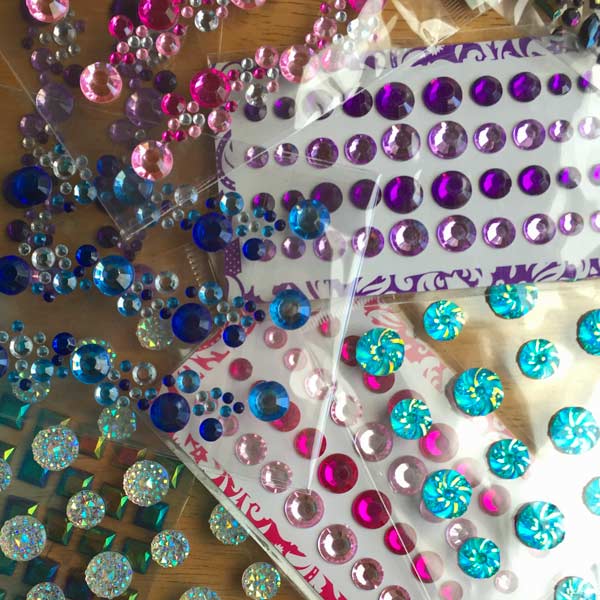
The “Glitter Bar” is a popular option for teen, older kid and adult parties. It includes glitter tattoos, which last 3-7 days, gems, face painted eye bling, and lots of festival glitter.

rose glitter tattoo

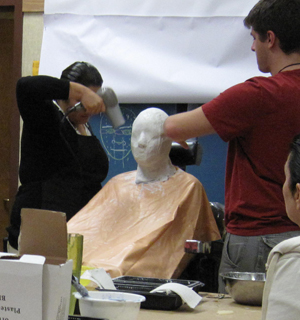
How did you learn to face paint?

An artist since childhood, I’ve taken classes with the rock stars of face painting including Mark Reid, Marcela Bustamante, Lisa Joy Young, Annie Reynolds and more…I’m always practicing and adding new designs to my repertoire. A natural clown, I’ve also trained in improvisational theater. I’ve been in numerous Improv troupes including BATS Sunday players in San Francisco.

Why should I pay for a professional face painter?

A professional face painter can accommodate a large number of guests, painting quickly but still maintaining the “wow” factor. This keeps the line moving and everyone happy. Non-pros tend to burn out quickly (face painting takes a lot of patience and concentration) while experienced painters can paint for hours. 

Professional face painters use high quality supplies that are made for use on the skin and maintain high standards of hygiene. Face paint, body glues, and glitter should be cosmetic grade, not craft supplies. Non-toxic does not mean skin safe. A professional has made a substantial investment in her craft and her kit, which allows her to paint many different designs well, safely and quickly.

Face paints used by www.auntiestaceysfacepainting.com

For smaller parties, a pro can add amazing details. My customers often comment, “This is the best face painting I’ve ever seen, and you did it so quickly!” So, you actually save money if you count the number of guests served. Plus, pros carry insurance, arrive on time, and dress appropriately.

Are you the only person in your company?

Auntie Stacey, face painter

There’s only one Auntie Stacey, but if you need an additional artist, I have a network of fantastic pros I work with including balloon twisters, clowns, and face painters.

Do you paint adults?

skull by Auntie Stacey's Face Painting, www.auntiestaceysfacepainting.com, kids, teens, adults, MUA, special effects

Yes, of course! Moms and teenagers love eye designs with plenty of sparkle. Dads like tribal eye designs and bling too.

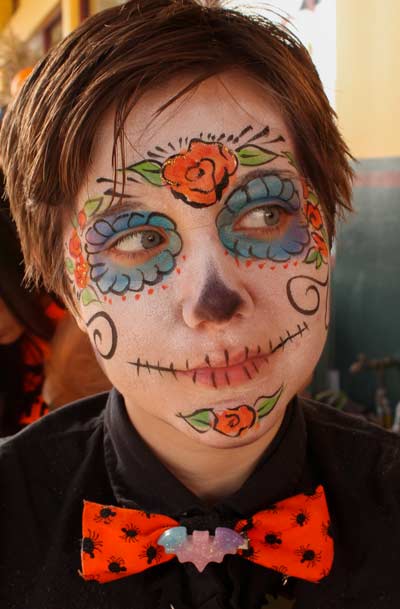
During Halloween I paint all sorts of beautiful and scary creatures by private appointment.

mermaid makeup face paint by Auntie Stacey Dennick, www.auntiestaceysfacepainting.com Fantasy makeup for the SF Bay Area

How did you learn to twist balloons?

I learned balloon twisting from clown friends, paid online courses and extensive YouTube searches. Having good supplies helps a lot, but mostly it requires a lot of practice.

What other kinds of art do you do?

I make mosaic glass art, which I sell in my Etsy shop. I create digital media and teach creative writing to adults.

Are you available for my party?

Feel free to contact me. Thanks for reading!

Auntie Stacey

Skull Face painting by Auntie Stacey, www.auntiestaceysfacepainting.com
Featured

How to Make a Life Face Mask – step by step

This is what I learned in my Santa Rosa Junior College Theater Arts make up class as per instructor Maryanne Scozzari. We’ll use these life castings to design and create prosthetic noses for character make-ups, just like they do on Sci-Fi’s Face Off reality TV show, well, almost.

By reading this post you agree to follow all safety guidelines and that you are responsible for maintaining the safety of yourself and your model. You also agree that you will not proceed unless you are over 18 years of age or have a parent in charge. Thank you for being careful!

1) First step to create a life mask: Prepare the space

Life Casting Supplies , Auntie Stacey's Face Painting, Special effects makeup, www.auntiestaceysfacepainting.com
Life Casting Supplies

Cover the work table with paper, it’s going to get messy.  Lay out all supplies.  Coat a plastic mixing bowl with Vaseline and fill one third full of warm water.  Precut a package of plaster bandages into three lengths: about 8” 5” and 3.”  Fill a pitcher with warm water for mixing the alginate and the plaster.  We used Hydracal for the plaster. Plaster of Paris is too soft to make a useful cast. Ultra Cal is favored by most professional special effects makeup artists, but it’s trickier to use and more expensive. Dental Stone is super hard and is used by dentists. Put up signs if necessary to maintain quiet and prevent interruptions.

2) Prepare the model

Pull back long hair into a low ponytail. Apply hair jell. Pull on an inexpensive bald cap and cut off excess if necessary. Rub petroleum jelly around the front and top edge of the bald cap, into the hair around the face, at the nape of the neck, and on the peach fuzz on the sides of the face. Wipe with alcohol to remove excess. Apply KY jelly to the eyebrows (especially if they’re bushy) and maybe to the eyelashes. Do not put oil-based products such as Vaseline near the eyes. Work out a thumbs up or down method of communication with the model so she can signal that she’s okay. People who tend to be claustrophobic find life casting stressful. Other people get so relaxed they almost fall asleep during the casting process. The model must stay upright and relaxed. No talking, eyes closed, breathing through the nose.

Grace ready for life cast

3) Alginate

Put on surgical gloves.  Mix the alginate according to manufacturer’s directions. Work quickly, scooping, mixing and smooshing with a spatula. Apply to model’s head to cover thickly, rubbing down, pressing gently into crevices.  Work quickly but be gentle.  Once the alginate is set it will no longer stick to itself. Work the alginate down the sides of the face and neck and towards the center.  Do not rub up and down.  Make sure to cover the area around the nostrils, while leaving breathing holes.  

Algenate: gooey, messy, harmless.

Never put straws up the nostrils! This is dangerous for the model, and could deform your mold. Keep your eyes on the nose to make sure the airway isn’t blocked. Speed up setting with hairdryers set on cool.  Be careful not to blow air up the nose.

4) Plaster Bandages

plaster applied to nose over algenate , Auntie Stacey's Face Painting, Special effects makeup, www.auntiestaceysfacepainting.com
Completed nose, before the rest of the plaster bandages are applied

Once the alginate is set, wet a thin strip of plaster bandage, squeeze out excess water and apply to the nose area to strengthen it. Repeat until the nose area is reinforced with at least 3 bandages. Apply 3 layers of plaster bandages to the rest of the face, alternating horizontal and vertical layers.  End with strips around the perimeter to hold the mold together.  

Dry with a blow dryer on the cool setting, keeping a hand between the blow dryer and the model to make sure it doesn’t become hot.

Never put plaster directly on the skin!

Drying the plaster bandages during live casting process

5) Remove the mask

Feel the plaster to see if it’s damp.  Once it’s dry have the model slide forward out of the chair, put her feet on the ground and begin to gently move her face around inside the mask, leaning forward, supporting the mask in her hands.  Insert your fingers between the mask and the model’s ears to loosen it.  Pull the bald cap up and off the back of the model’s head, letting it slide off with the mold.  Help support the mask as it comes off.  The alginate will hold an amazing amount of detail.  The plaster bandage layer holds it together.

life cast alginate mold

6) Prep the negative mold for plaster

To make the cast leak proof, add several strips of plaster bandage to the nose holes and allow to dry. Place the cast in a cardboard box on top of shredded paper or other padding. Rub Vaseline around the inside of the nose holes. You can plug them up with bits of oil-based clay (such as Plastilina).  Rub Vaseline where the plaster bandages will touch the poured plaster such as inside the bottom neck area and around the edge of the whole head. Otherwise the plaster will stick to the plaster bandages and make it difficult to open the mold. Plaster always sticks to plaster

7) Plaster pour

Put on a particle mask to protect your lungs. Fill the plastic bowl that was coated with petroleum jelly with cool water.  Carefully add plaster until the water no longer absorbs it and it looks like a dried riverbed. Squish the mixture with your gloved hands, squeezing any lumps.  Try not to introduce air into the mix.  Pour into the prepared molds. Tap the mold to release air bubbles as it cures. It will become hot and then cool. Carve your name and the date onto the back side of the mold.

Hydrocal with enough water, ready for mixing. Auntie Stacey's Face Painting, special effects makeup, www.auntiestaceysfacepainting.com
Hydrocal with enough added water, ready for mixing
Live cast filled with Hydrocal plaster , Auntie Stacey's Face Painting, Special effects makeup, www.auntiestaceysfacepainting.com

Poured plaster and alginate mold in a bed of shredded newspaper, inside a box.

8) Cure the mold

Allow the mold to cure for 4 to 6 hours. The nose on the mold should be cool to the touch.  Spread out newspaper.  Turn the mold over onto a soft surface.  Remove plaster bandages and discard.  If they don’t come right off, cut carefully with a sharp knife.  Remove the clay nose plugs and the alginate.  Discard.  Clean up any bubbles or other flaws on the plaster cast using carving tools, but don’t change the skin texture or other details.

Life Cast before sealing , Auntie Stacey's Face Painting, Special effects makeup, www.auntiestaceysfacepainting.com
Emma’s life cast before sealing

Place the mold on the middle rack in a preheated oven, at the lowest possible setting (less than or equal to 200 degrees) and bake for 45 minutes to 1.5 hours.  Do not use a pan, just place it on the rack so air can circulate. Check it frequently!  If your mold turns yellow take it out.  Otherwise, let it cool in the oven, turned off, with the door open.

9) Final prep and seal

Finally, seal with a mixture of alcohol and baby oil, or clear acrylic spray. Use 2-3 coats. 

Your mold is ready to use for making facial prosthetics such as noses, horns or zombie skin. See how to make a prosthetic nose or other cold foam appliance for the face.  How to Make a Prosthetic Appliance on a Life Cast. Enjoy! —Auntie Stacey

© Copyright 2020 Stacey Alysa Dennick, All Rights Reserved.

Featured

Top Ten Party Planning Tips for Little Kid’s Parties

1) Avoid overwhelm by keeping the number of guests to a minimum.  Consider the wisdom of inviting the same number of guests as your child’s age.

2) Listen to the guest of honor.  Children love being involved in picking themes & colors, planning menus and decorating.  Siblings too!

3) Ask for help. Enlist other grown ups for specific assistance such as bringing a food dish, straightening up, or sticking around to lead activities.

4) Eschew perfection. Don’t worry if the house is spotless or the banners are hung crooked, or didn’t get hung at all!  Focus on making the guest of honor feel special.

5) Avoid the sugar blues.  Serve wholesome favorite foods well before chips and cake.

Paw Patrol with Frozen Princess, www.auntiestaceysfacepainting.com SF Bay area face painter Auntie Stacey Dennick

6) If you’ve hired a face painter, I’ve found it’s best to have her arrive late enough to make an entrance, but early enough to paint the guest of honor before the party gets too hectic.  Make sure someone takes lots of pictures.

7) Plan more activities than you think you’ll need.  Favor cooperative games over competitive ones.  Don’t award prizes unless everyone gets one.  Alternate frenetic games with story time or craft activities.

8)  Have contingency plans for wet, sweltering or arctic weather.

9) Don’t open the birthday gifts until after all the guests leave.  This avoids jealous tears, and makes it a lot easier to keep track for thank you cards.

10)  Avoid the sugar blues part II.  Send everyone home shortly after the cake is served.  This ends the party on a sweet high.

Have fun, be colorful!

Love,

Auntie Stacey

© 2020 Auntie Stacey Dennick, all rights reserved

Tips for Volunteer Face Painters & Helpers

Even the most experienced face painter can’t paint more than about 20 kids per hour. At a big event, this leaves too many kiddos waiting in a long line. But, with a little planning volunteers can make a big difference. Here’s what you need to know and obtain to get the most out of your volunteer face painters.

The Line Manager

A line manager can make a huge difference in how many people get painted quickly in an orderly and joyous environment. The line manager keeps track of who’s next in line and helps them decide what design they want before they get in the painter’s chair. Every minute counts at a school fair or festival! This brings us to another time saver, a menu.

Face Painting Menus

menu of face paint designs

A menu of face painting options can be made using clip art. Designs such as hearts, flowers, spiders, and basketballs are quick and easy to paint. Using the same menu for all of the painters streamlines selection. More experienced artists can embellish or alter the simpler designs while newbies can fulfill the basics. Of course, the quickest designs are those that the artist has practiced.

If possible, laminate the menus or put them in plastic sleeves so they last all day.

How To for Volunteer Face Painters

With a few high-quality supplies and on the “job” practice, volunteer face painters help ensure that everyone who wants face painting receives it in a timely manner. If you have the budget, it’s better and safer to hire several face painters. Professionals carry liability insurance and have extensive kits bursting with colors, brushes, stencils, sponges, and other supplies which they use to efficiently produce designs with a “wow” factor. But, for schools or fundraisers, teenagers or parents can do a decent job. Just be sure to:

  • Use high quality supplies that are made for use on the skin (non-toxic does not mean skin-safe!). Snazaroo and Klutz both make kits with cosmetic grade paints and glitter. (Don’t use craft glitter! It could hurt someone’s eyes.) 
  • Stick to water activated paints. The grease crayons are hard to work with. 
  • Purchase two or three art quality brushes (one #4 or #5 round, one ½” filbert) rather than seven cheap ones.
  • Maintain hygiene. Provide plenty of fresh water. Clean any brushes that are used near the mouth with 99% alcohol.
  • Plan for burnout. Face painting takes a lot of concentration. Most volunteers will not be able to paint for more than an hour or two. 

Additional Face Painting Supplies

Frozen Princess face painting by Auntie Stacey, www.auntiestaceysfacepainting.com

In addition to quality face paints and brushes, be sure to have baby wipes (to clean faces and erase mistakes), hand sanitizer, 99% alcohol (for cleaning brushes), two containers for clean water, and at least one mirror for each table. I’m always amazed how many people forget the mirror! Kid safe ones —acrylic rather than glass—are best. 

With a lot of planning and a moderate investment in supplies, more children can receive safe and fun face painting at your next big carnival or school party. But don’t forget to hire a pro to produce quick and beautiful designs that will impress older children, parents, and teens. I offer discounts for schools and non-profits. 

I hope to paint fun for you soon! —Auntie Stacey

Monster face paint by Auntie Stacey, www.auntiestaceysfacepainting.com

Auntie Stacey packs some info

Auntie Stacey face paints a dragon, face and body paint by Auntie Stacey Dennick, San Francisco Bay area face painter

Mightygoods.com included me in a article about how professional face painters pack and prepare their gear. Here is my section.

I live in Northern California, about two hours north of the Golden Gate Bridge, in beautiful Sonoma county. A friend encouraged me to try face painting many years ago. She showed me a few designs and I painted at birthday parties occasionally. When I moved to Wine Country in 2010, I decided to become professional. I started face painting most weekends, attended face painting conventions and practiced a lot. Having good supplies makes all the difference, it’s an investment-I want every color! But I have to limit it or my bag would weigh a ton.

What top 3 things do you bring besides the common stuff all face painters bring?

  • I often bring balloons for twisting, which is a great addition for birthday parties, restaurants and lower volume gigs.
  • I always bring an extra mirror that sits on my table so kids can run over and check their make-up.
  • Although I don’t always use them, I like to bring some powder-based colors. These are great for super-hot days, wiggly toddlers and fairs where there is a long line, as they go on very quickly and don’t smear in hot weather.

How do you bring things with you?

Auntie Stacey Superhero Super face painting and balloon twisting

I can fit just about everything I need into an old Eagle Creek rolling bag similar to the Gear Warrior™ 29. I like that it stays upright. It’s very important that I pack the same way so I can set up quickly and don’t forget anything. The bottom layer of the bag holds 3 plastic lock top containers containing individual paint cakes in containers that screw together for fast access; glitter and gems, hair clips, powders, 99% alcohol, lip applicators & body glue. Baby wipes go on top of them. My custom make-up case sits evenly on top of this. It uses less space to store the cakes with their lids on, but it takes too long to open all of those little containers, keep track of the lids, and put them away. When I open my case, I get oohs and ahs from guests observing the beautiful rainbow colors I have. Face painters are entertainers as well as artists, so I always arrive in a fun costume with flowers or something small painted on my own face.

Next, I place two folding holders full of paint brushes (from an art supply store) a plastic zip container with stencils, two small water bowls (better, IMHO, then the water containers that also hold brushes because they make it easier to change your water) and two ACE plastic buckets. One contains makeup sponges, a hand mirror, water spritzer, small brush holder, hand sanitizer, cards, a small towel, pen and notepad…so many little things. The other bucket goes under my table for used sponges and dirty baby wipes. My notebook of designs goes in front of the bag with my tablecloths. There’s even room in the top of the bag for a jacket. I strap the bag into my car’s backseat like a precious toddler so it doesn’t tip over. Packing this way, I can wheel in my gear and set up in five minutes.

I always lay out my supplies the same way, so that I don’t waste time looking for things. Another reason to keep your supplies to a minimum is that you might not have much table space at the party to spread out into.

What are your top tips for other face painters?

Safety is paramount. Only use skin-safe, high quality products. Use a disposable applicator for lip color, or clean your brush with 99% alcohol between kids. Parents appreciate smaller designs that avoid the sensitive eye area and messy mouth zone. Sure, that 5 year-old looks adorable in the chair with a full tiger face and painted lips, but within 2 minutes she or he will eat and drink and the bottom half of her face will be a mess.

Link to the entire article, including amazing face painters from around the world.

Auntie Stacey in the News – Rockin’ Dia de Los Muertos in San Francisco

I recently painted at a Day-of-the-Dead-themed fundraiser, held at the Raven Night club in San Francisco. What a blast! Students from San Francisco State University did a fabulous job organizing a variety of entertainment in a classy bar. By 11PM on a Wednesday night, the venue was full of dancing youths, many of them painted by yours truly. A significant amount of money was raised for the charity All Hands- dedicated to victims of Hurricane Katrina-students received college credit while drinking and I had a blast painting adults.

Check out an article about the event in the Golden Gate Xpress online.

Petaluma Pumpkin Patch – Face Painting & Family Fun

Face painting by Auntie StaceyI’ll be face painting this Saturday, October 3, Saturday October 17, Sunday October 18 and other days to be determined, at the Petaluma Pumpkin Patch, a wonderful family-run venue.

Overflowing with autumn harvest bounty; sunflowers and pretty pumpkins growing in a large field. We got a big orange and green speckled one last year which turned completely orange and lasted for months uncarved.

Free activities include:

  • Huge straw mountain with over 500 straw bales to climb
  • Farm animals
  • Little kid’s Maze
  • Rubber duck races
  • Corn Kernel sand box
  • Free parking

Lots of other activities on weekends: face painting, horse rides, jumpy, snacks, etc. Kids and adults were all over the corn maze, I hear it takes 45 minutes to go through it, but I didn’t try it.

Since 1993, All produce sold at the Pumpkin Patch is locally & sustainably grown by 4th generation Petaluma Farmer Jim. Auntie Stacey's Face Painting at the Petaluma Pumpkin PatchOver 50 varieties of pre-picked squash, pumpkins and gourds. Pick pumpkins from the vine in the pumpkin patch. Open everyday in October (if it’s not rainy or muddy) with special weekend events.

Budderball the clown face paints there regularly, so be sure to say hi to her from Auntie Stacey. She’s the one with the blue hair.

Tip: The Pumpkin Patch has to close when it’s raining or muddy so check their Facebook page for updates during wet weather.
Petaluma Pumpkin Patch hours
Sunday-Thursday: 10AM TO 6PM
Friday & Saturday: 10AM TO 10PM

Admission to the corn maze closes 30 minutes prior to closing.

Petaluma Pumpkin Patch, photo by Stacey Dennick

450 Stony Point Road
Petaluma, CA 94952
Phone: 707-781-3132

Have a safe & happy Halloween!

See you soon,
Auntie Stacey