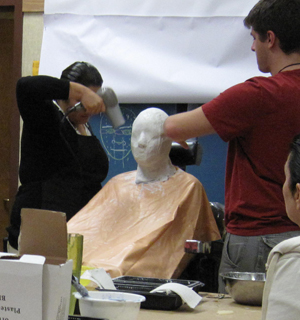
Continuing the advanced makeup class at Santa Rosa Jr. College, I used the life cast I made of the beautiful and patient Grace Kent to make a prosthetic nose out of cold foam for this (admittedly odd) mermaid makeup. Here are the steps for making the nose (or other appliance) of your dreams.
Sculpt: Place the facecast on a tray or work surface, supported underneath by a lump of modeling clay. Use the life mask to sculpt a nose (or whatever). We used Plasticine clay as it is oil based and doesn’t dry out and crack like regular clay. Think about how the actor will move, breathe, and speak. Make thin, uneven edges. Use oil & alcohol on the Platicine clay to smooth and thin the edges. But don’t let them extend far past the nose. When you’re happy with the design add texture with a paper towel, grapefruit peel or stipple sponge. Use Saran wrap over the clay to smooth out any fingerprints or unwanted texture. Make your design bold enough and details sharp enough that they will read from stage. Keep in mind you’ll lose some detail through the foam process.
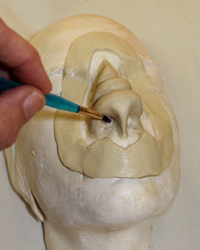 Make the mold: put Vaseline ¼” to ½” wide around the nose and inside the nostrils. You might also want to paint the clay with baby or mineral oil to prevent sticking, especially if your design is tricky.
Add clay flashing around your piece. A flat piece of plasticine clay, about ¼” thick. Bevel the outside edge of the flashing. Use water based (cheaper) clay to build a wall around your piece. 1.5” higher than the highest part. 1” thick by 1” by 1”. Make sure the edges are sealed so no plaster will leak.
Prepare the plaster. Pour into the mold. Bang on the table to encourage air bubbles to escape. Let it dry.
 Remove clay damn. Separate the nose mold from top to bottom using a screwdriver to loosen it. Remove the clay from inside the nose mold. Clean with warm water. Let dry overnight.
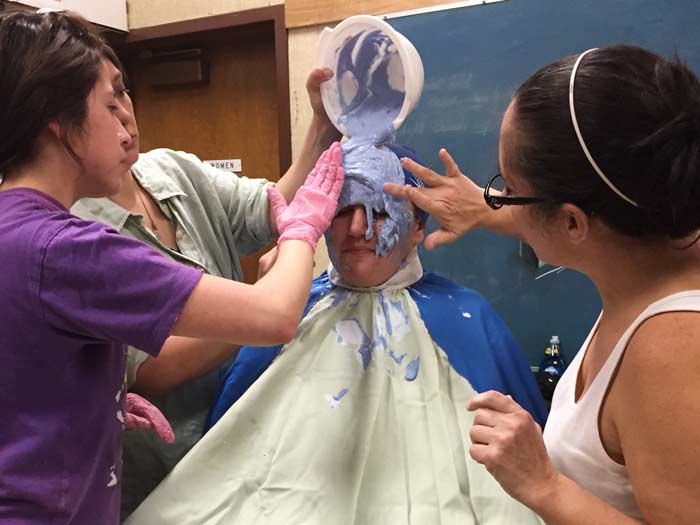
Cold foam: We used Kryolan brand. Get all supplies ready. Read through all the scary safety info. Put on vapor mask and gloves. Take mold and supplies outside. Apply 3 layers or so of mold release to the life face cast and the nose cast. Dry between layers. Rub off excess release with a soft cotton cloth. Heat the molds in the oven or with a blow dryer.
Mix cold foam in a Dixie cup
½ teaspoon B – base
¼ teaspoon A – catalyst – should be enough for a nose
Mix with wire until one color, which doesn’t take long. Pour into the mold, making sure to get it into the crevasses. Put the mold onto the life cast. Put a heavy weight on top. Check the leftover foam in the cup. When it’s tacky but doesn’t come off on your gloved fingers it’s ready. Pull the mold off from top to bottom. Peel carefully! Powder. Don’t put the cold foam appliance on or near your face for 24 hours-it is toxic! After a day store the appliance in a plastic bag. Pre-paint before application.
Painting the appliance: Add a drop of mineral oil to the make up (I used Ben Nye oil based stage makeup with some water based face paint on top) so it will stick, making a paste with make up, oil and powder. Or use Kryolon rubber make grease paint. Powder and add another layer of paint. Add highlights, shadows and texture. You’ll need to paint it again once it’s applied, but you want to move quickly as the appliance isn’t fun to wear.
Fitting: Put the nose on the model’s face. Is it too close to the eyes? Too high on the forehead? Does it end near the nose? Unless it’s a hard edge, you want the edges uneven and close to the nose. Tear off excess (irregular edge for smooth blending). Use scissors around the nose. Cut breathing holes with the scissors. Paint the edges with spirit gum. If the model will be wearing the prosthetic to perform (not just for a photo shoot) paint inside the center with spirit gum as well. Put on face. Use paper towels to press the edges down. Spirit gum is a contact cement, it needs two surfaces covered to adhere. Remove the nose, apply more spirit gum on the wet area of the face. Re-apply nose. Press with a paper towel. Rotate paper towel. It will take five minutes. to get tacky. If the edges come up apply latex. Use a sponge to stipple it on, or a Q-tip. Allow to dry completely before you paint the rest of the face. Use spirit gum remover to take off the nose.
 Happy creating. – Auntie Stacey

Check out Mollye Kestler Tobias’s amazing rhino makeup 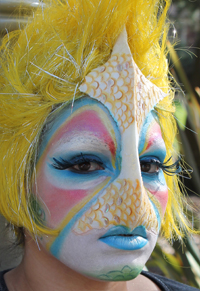 and Judy Hallandale’s fantastic rainbow fish
© 201 Stacey A Dennick, all rights reserved
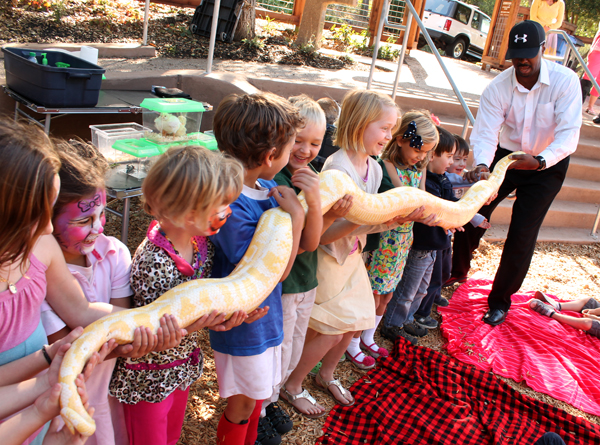
 As a face painter, I see a lot of children’s entertainers, but East Bay-based Tracy Hill’s show was fur and scales above the rest. He does a hilarious animal show with so many different critters including a hairless mouse, a scorpion, a rabbit, two chicks, a goose, a turtle, a tortoise, a tarantula, a hermit crab, and not one, not two but three snakes. A former kindergarden teacher, Tracy keeps the children engaged with constant audience participation. They wiggled, waved, flapped and laughed through the entire show.