How to Paint a Leopard Face – step by step tutorial

For this make up I used Kryolan brand white and yellow, along with Wolfe brand black. You can use any band you like, as long as it’s face paint – that is makeup, not paint made for paper or canvas. Non-toxic does not mean it’s safe for use on the body. My lovely friend Willa is my model.

How to Paint a Leopard Face, step by step by Auntie Stacey Dennick

1) The Background

Spritz your white makeup cake with clean water from a small spray bottle. Wipe a dense makeup sponge back and forth across it a few times until your sponge is saturated with color. Stipple white above the eyes where you might put eye shadow with quick, firm, patting motions. Rubbing the makeup on might leave streaks. Reload your sponge and apply white under the nose and below the mouth for the muzzle. It helps to squeeze the sponge into a circle.

How to Paint a Leopard Face - Auntie Stacey's Face Painting, SF Bay Area

Next, load a new sponge with yellow or gold and apply over the rest of the face, taking care to press the color into the corners of the nose. If you want to even up the sides, or you goofed a bit, grab a baby wipe (unscented are best) and wipe off any excess. Add some white for the inner ears.

2) Get dotty

Grab a small round paintbrush. I like to use a Lowell Cornell number 3 or 4, and load it up with black face paint. Wolfe brand is great because it’s super strong, but any black will do. Paint furry hair around the perimeter of the design. Add a few ear hairs. Paint lines around the white muzzle. Add three rows of wiggly lines or dots on the muzzle where the whiskers would be. Paint a delicate line down the middle of the upper lip, starting from under the nose. Paint the end of the nose. Add your leopard spots. These should be smaller near the nose, and bigger, “C” shapes as the move away from the center of the face. Finish with a quick flick of the brush at the outer edges of the eyes to simulate cat eyes for younger children. If your model doesn’t mind makeup near her eyes, eyeliner is a lovely addition.
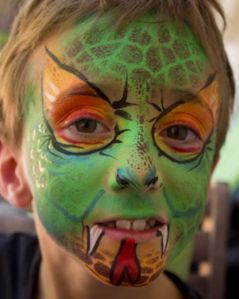
3) Time to Roar!

www.auntiestaceysfacepainting.com

Admire. Take a photo. Go play! Remove the make up with soap, water and a washcloth.

 Enjoy! – Auntie Stacey

© 2020 Auntie Stacey Dennick, all rights reserved. Please do not copy without written permission

How to be a better face painter

Lisa Joy Young at BayFABA

People often ask me how I learned to face paint. As with any skill, you need a combination of instruction, practice and good tools to become proficient.

For expert instruction, I recently attended the first annual San Francisco Bay Area Face and Body Art convention, known as BayFABA, this past September. What a treat! It was so fun to be surrounded by other face painters, our kits spread out before us, happily painting roses and teardrops on our arms, legs, and anything else we could reach.

With so many top face and body artists present, it was difficult to decide which sessions to attend. I chose to start off with Lisa Joy Young, whose Youtube channel is a must for all aspiring face painters. She’s just as organized and sweet as she is in her videos.

Another highlight was learning florals from London-based

Brierley Thorpe at BayFABA

Brierley Thorpe. Wow! Her designs take face and body painting to the realm of fine art. I’ve got to get back to practicing my flower designs.

Happy autumn!

– Auntie Stacey

BayFABA flowers by Brierley Thorpe
Flowers by Brierley Thorpe

Halloween Cosplay Tips from a Face Painter

1) Find inspiration in your closet

Auntie Stacey Frozen Winter Queen Face painting balloon twisting San Francisco bay area, Marin, Sonoma, Santa Rosa, San Rafael, children's entertainment

Special occasion clothes can be the perfect starting point for a costumed character.

The flower girl dress from a wedding makes a fantastic start for a fairy princess. Tuxedos for vampires, graduation grown (belted, with a shredded hemline) for witches.

Worn clothing can find new life, eh, undead life, as a zombie’s outfit.

2) More face paint, less mask

Masks are hot, uncomfortable and hard to breathe through. They restrict vision, which could lead to falls and bruises. Make-up looks more realistic and feels better.

3) Plan your design

Sketch out a few ideas beforehand, remembering to keep it simple. A face is a lot harder to paint than a flat piece of paper. Try to isolate your character’s one essential detail, such as a cat’s whiskers or Superman’s graphic S.

4) Look online for images & tutorialsSnake face paint by Auntie Stacey

A Google search will yield almost too much info.

5) Don’t use craft paint!

Your mom was right when she told you not to draw on yourself with Sharpie pens. Art supplies and craft glitter may be non-toxic, but they are not hypo-allergic or in any way safe for use on the skin! If craft glitter gets in your child’s eye you are not going to have a good evening. Only use quality products that are approved for use on the face and body. Here’s a link to a supplier.

Auntie Stacey's face painting
This Zombie’s shading was done with eye shadow.

6) Use the make up you have

Eyebrow pencils work well for adding kitty whiskers, pirate’s wrinkles or a vampire’s hairline. Place dark eye shadow around the eye socket to make your zombie’s hollow eyes. A blend of purple, dark grey and dark brown is ideal. Use blue eye shadow for a Frozen inspired design.

7) Supplement with face paint

There’s nothing like quality water based-face paint for bold colors and good contrast. Halloween stores usually stock small quantities of good brands such as Wolfe Brothers, Snazaroo and Kryolan

8) Get a good brush

One #5 round with a perfect point is worth 10 cheap brushes designed for three-year-olds to destroy.  Lowell Cornell makes great watercolor brushes. Look for them at art stores. To use them: Mist the make up cake with water. Load the brush with paint by rolling it back and forth in the cake. Practice making thick and thin lines on your arm and/or legs. It takes a while to feel how much water to use.

9) Make your own fake blood

  • 1 cup corn syrup (Karo or other brand)
  • 2 tablespoons water
  • 2 tablespoons of red food coloring
  • 1 tablespoon of chocolate syrup
  • 2 tablespoons of cornstarch

Combine all ingredients in the blender and mix for a few seconds. Variations on the recipe include the use of coffee or red fruit punch. Experiment. But please don’t feel obligated to use all the blood you make on your face and costume – it is messy.

face paint by Auntie Stacey10) Consider hiring a pro

A professional face painter will bring a full kit containing all the colors of cosmetic grade face paint you’ll need for every design. She’ll be fast and full of ideas to make your characters come to life.

I hope you have a blast creating an original, safe and fun Halloween costume and make up!

– Auntie Stacey

Flat Stanley visits Auntie Stacey in Sebastopol

Flat Stanley learns about fritMy friend Dylan sent Flat Stanley to me in Sebastopol, California for a visit as part of his second grade literacy and community building project.

I couldn’t talk Flat Stanley into getting his face painted, so he watched while my husband and I did some fused glass art.  We use special glass that comes flat (Stanley’s favorite) in chunks or powder called frit, and in skinny sticks called stringers.

The different colors come from minerals and chemicals in the glass.  For example, cobalt makes blue.  Sulfur makes yellow.  Pink is a very expensive color because real gold goes into making it.

https://www.flatstanley.com/about

We spread out the flat glass on the kiln shelf, then sprinkle layers of frit.  When it’s melted in our kiln (a giant, really hot oven for heating glass or pottery) the glass gets red hot, and flattens into one big smooth piece.  After the glass anneals (cools slowly so it won’t crack) we’ll take it out ofthe kiln, clean it, cut it into a shape and make something out of it.  Maybe a bowl or a dish.  Do you think Flat Stanley would like it better flat?

Fused glass lizard bowl by Leland and Stacey Dennick

Auntie Stacey Wins at Copperfield’s Zombie Walk

Stacey Zombie by Auntie Stacey Dennick's face painting
Auntie Stacey Zombie at the Sebastopol Farmer’s Market

You heard it hear first, Auntie Stacey Dennick won First Place in the adult category of the Zombie Moaning contest at Copperfield’s Books in downtown Sebastopol.

Every year Copperfield’s sponsors a Zombie Walk at several locations. Auntie Stacey was on hand today, Oct. 27th, for free zombiefication of anyone who wanted face painting.  After receiving instruction on proper lumbering, moaning and crowd interaction, a couple of dozen zombies, and as many groupies, terroried the Farmer’s Market. Then, it was time for the Zombie Walk Sebastopol 2013contests.

Auntie Stacey was a finalist in the lumbering contest, but lost to the Zombie Bros.  Undaunted, she pierced the competition with her soul searing moans.   Copperfield’s awarded prizes (books!) and served cookies.  What a great way to start the day!  Thanks.